|
 I've spent the last few days
tweaking the circuit and fidgeting with the hobbyist's kit, then putting
the completed project on a breadboard to make sure every LED would light
just the way I wanted it to.
I've spent the last few days
tweaking the circuit and fidgeting with the hobbyist's kit, then putting
the completed project on a breadboard to make sure every LED would light
just the way I wanted it to.
When I went to Radio Shack to
get the parts, the employees were really funny - "Why didn't you use
a 555 timer with a pot?" Because a) I can test and tune this
with parts on hand, and b) my knowledge of micro circuitry you can put on
the head of a pin in large print. I'm actually pleased I did it this
way, because I had to make some changes again as some parts weren't
available with the specific values I wanted.
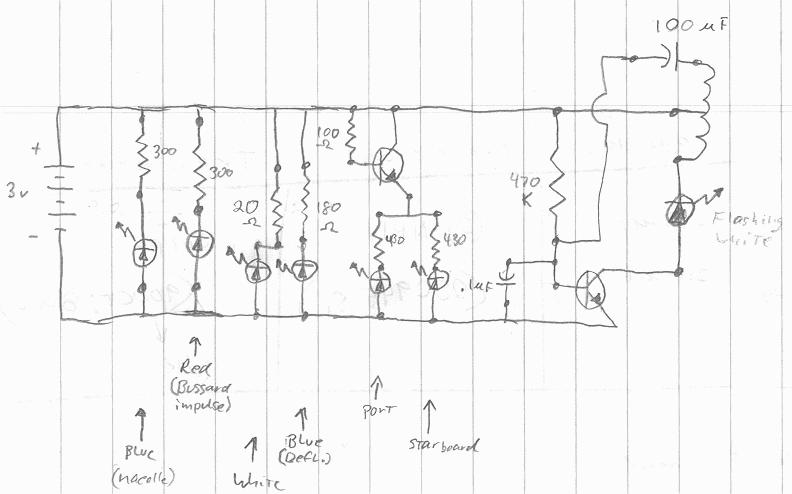
 Here is the final circuit diagram, with the
correct values. The flashing white LED rate is 1 / 2.8 sec.
The transformer is 1k:8 Ohm, and the transistors are NPN 2SC945 Si.
The deflector dish LED (Blue) has a resistor in circuit that is 180 Ohms,
about 160 more than I'd like but I wanted to get this bad boy done so I
used a resistor I found in my box 'o' tricks. If necessary, I'll
just tuck another LED behind the deflector. The transformer I bought
will supply whatever current it needs (3v, 700ma). Here is the final circuit diagram, with the
correct values. The flashing white LED rate is 1 / 2.8 sec.
The transformer is 1k:8 Ohm, and the transistors are NPN 2SC945 Si.
The deflector dish LED (Blue) has a resistor in circuit that is 180 Ohms,
about 160 more than I'd like but I wanted to get this bad boy done so I
used a resistor I found in my box 'o' tricks. If necessary, I'll
just tuck another LED behind the deflector. The transformer I bought
will supply whatever current it needs (3v, 700ma).
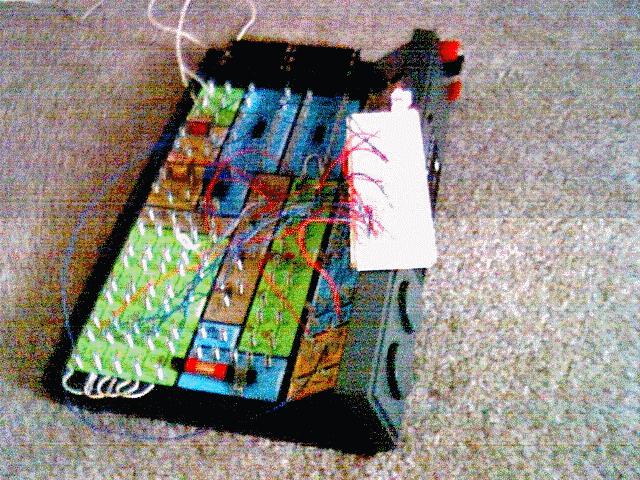
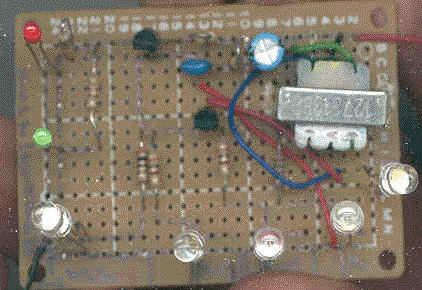 Here is the final circuit
board! It took me four hours to do it. Personally,
I think it looks horrific - quite the Frankenstein - but it works and I
actually got it right on the first try with nothing cross-wired, backwards
or with "solder leak". The board is approximately
1.75" wide by 2.75" long. The LEDs mounted are just to
confirm everything's alright - they'll be removed, replaced with wire and
moved to their appropriate places on the ship. I intend to mount
this on the ship using stand-offs, and then glue the stand-offs to the
bottom of the saucer section that is inserted into the engineering section
during assembly. The stand-offs were made with the 'tree' plastic
(that the model parts come on) - I cut them to length, inserted them in
the four holes, melted the top and glued them in. The circuit board
will be upside down inside the ship, but I'm comfortable that it will be
quite solid. Here is the final circuit
board! It took me four hours to do it. Personally,
I think it looks horrific - quite the Frankenstein - but it works and I
actually got it right on the first try with nothing cross-wired, backwards
or with "solder leak". The board is approximately
1.75" wide by 2.75" long. The LEDs mounted are just to
confirm everything's alright - they'll be removed, replaced with wire and
moved to their appropriate places on the ship. I intend to mount
this on the ship using stand-offs, and then glue the stand-offs to the
bottom of the saucer section that is inserted into the engineering section
during assembly. The stand-offs were made with the 'tree' plastic
(that the model parts come on) - I cut them to length, inserted them in
the four holes, melted the top and glued them in. The circuit board
will be upside down inside the ship, but I'm comfortable that it will be
quite solid.
Now that the electronic issues are out of the
way, I can continue with assembly of the Enterprise-D. I need to
experiment with the paint values to get the Voyager's primary and secondary hull
colors correct. Once that's done I'll put a gloss coat on it and learn how
to apply decals.
|