|
You know, when one cares about
every minute detail of modeling, I don't think there's a single aspect
that isn't extremely complicated and time consuming, you know that?
These puppies are not your
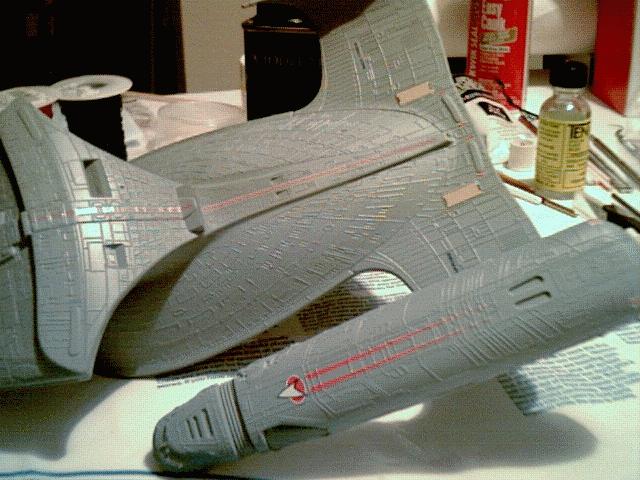
average stickers. In the image above you'll see the
Enterprise D model painted with the primary hull color I intend for the Voyager (though it's going to be a drop of Duck Egg Blue brighter,
yesterday's recipe modified accordingly), and some of the decals in their
proper locations (again, another strike against Ertyl - they don't accommodate
for decal placement in their drawing of lines on the hull - this'd be
great if those lines were there on the prototype ship, but they're just
there to look "cool" / complicated. This model's shit,
dude).
The Model Master guidebook I
purchased was very helpful here, though I had to improvise on their
placement methods / recommendations to suit what I like best. I've
tried their way on some of the decals and my way on others, and made stuff
up on yet more. Setting solution is great stuff, I need to mess with
Decal Solvent Solution next; the latter is stronger than the former,
actually partially dissolving the decal so as to ensure it conforms to
every aspect of the plastic. I can only advise use of this stuff, it
makes the decals look much better.
After I play with Decal
Solvent Solution I need to get some more fibre for the fibre optics, and I
think I'll be ready to start on the Voyager herself.
For what it's worth, here is
my advice regarding decals.
Anybody who's dealt with disposable contact lenses
will have a much better time handling these things!
Mandatory tools and their uses:
-
two fine, small paintbrushes
-
latex surgical gloves
-
You'll be handling the model a lot, getting it
in the right position to allow for perfected placement of the
decals, thereby getting fingerprint oil on it. Since you're
applying decals to the gloss coat (you are, right?) you'll
actually feel your fingers sticking to the model.
-
dental tools
-
These things are awesome! The point helps
remove obstinate cardboard backing, the bends help align and
smooth (though a brush might work best, it's a tool when
appropriate). If you've had or seen LASIK surgery you'll
understand this one - with a good pool of water all around the
decal, carefully slip the point and shank of the tool beneath the
decal, and with surgeon's hands pull the tool beneath and along
the decal to straighten it out - perfect trick for the long
stripes.
-
decal setting / solvent solution
-
I prefer to use this after the decal is set and
mostly dried. The Model Master book recommends you paint the
surface with this stuff, then slide the decal in place over the
pool of this material. I found this put way too much of it
on the surface and actually marred the paint a little. So
far, if you paint the set decal with it, it works mighty
fine. Don't be afraid to apply multiple coats.
-
paper towel / fine cotton pads
-
Use for wicking up excess water or setting /
solvent solution, cleaning your tools (which will get a thin layer
of adhesive buildup while you work), or touching the decal
directly to get the water up.
-
fine tweezers
-
perfectly sharp X-Acto knife (or scalpel would be
best)
-
These decals are extremely thin layers of
colored film, and some of them are too close together on any given
decal sheet. You'll be doing some precise cutting -
according to the Model Master book, if you're applying decals to
light paint you'll even need to trim the 1/16" transparent
part around the colored part! You could be making cuts with
1/16" precision - use a perfect tool, it's hard enough as it
is.
-
small, rectangular tub of water
-
Basic, yes, but don't forget it's going to be
your best friend for a while - use a clear bowl / tupperware
thing, probably in a rectangular shape and flat.
-
slip of cardboard
Have a cup of tea handy and be listening to comfortable tunes - you're
gonna be workin' this a while!
|
|