|
The picture above is
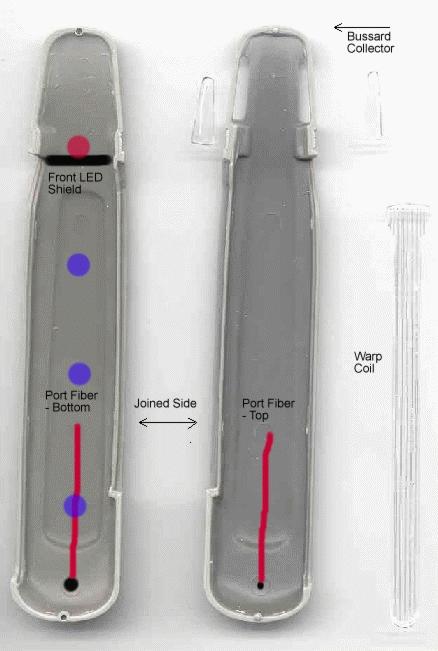
pretty primitive, but it conveys what I'm after. On the right
you can see the transparent plastic parts - there is one strip for the
warp coil, and two oblong shapes that are for the bussard
collectors. The first issue is the lights, and where
they'll all go. Then there is the painting of the plastic and
the painting of the hull, masking, assembly and wiring.
There are three different lights used - one red LED in the front for
the bussard collectors, the three blue LEDs for the warp coil, and the
fibre lines. I intend to mount everything I can on the
bottom, the only exception being the upper port / starboard indicator.
The one red LED in front is going to be pretty tricky, because I want
to mount it so that it shines across the clear plastic and the hull at
a specific angle. LEDs are very bright in front, and this one is
likely to blow through the hull plastic and light up the whole front
end, not just the clear windows. Therefore, I'm going to put
some reflective mylar right in front of it to block the strongest
light, and paint the rest of it reflective aluminum. The other
issue here is light leakage between the red and blue LEDs. So, I
think what I'm going to do here is build a thin plastic mount, kind of
a barrier between the two sections (labeled in the picture above as
the 'front LED shield'). I'll drill a small hole in it and put
the LED through that, then glue it in place. The barrier itself
I will paint black. The blue LEDs
will point upwards so that it will be the ambient light that
illuminates the coil (that way you don't get three distinct dots
inside). I plan on putting some mylar up there, too.
The fibres will be run just like the ones in the primary hull, but
will be very short. I'll attach the small 2-volt LED right there
in the nacelle with heat shrink tubing, such that there will be
nothing but wires coming out of the nacelle.
The painting is going to be pretty complicated. Because of the
lit clear parts, I want there to be reflective light, and am in fact
using that as the primary light source. I also don't want any
light leakage. I intend to paint the whole insides black (just
to add a layer of paint), then paint it aluminum and buff it.
I'll then paint the inside of the clear plastic parts, then mount
them. I'll then mount the
front LED shield, then the LED and glue it in place to the correct
angle. I think I'll need to use a sprue (or the plastic I make
the shield out of) to make a mount point for the blue LEDs.
This being done, there will then be three pairs of wires coming out to
go through the nacelle pylons. One pair for the front red, one
pair for the blue, and one pair for the small red / green (port
starboard indicators, fibre driver LED).
Paint used for this part of the ship -
-
flat black
-
Aluminum plate (buffing)
-
red metallic
-
true blue pearl
Unfortunately, I wasn't able to find
the colours they recommend for painting the model (watermelon pink and
light ultramarine blue). These colors seem closest.
|