
07/28/01
|
This part's actually broken down into chapters:
Lighting and Components While pouring over the assembly instructions, I've been trying to figure out exactly how the lighting is going to work. I'm going to need to install all wires, lights, fibres, etcetera, before constructing and sealing the model. This is foreign to me because I assembled the Enterprise-D by putting slot-A into tab-B, as it were. This has to be much more carefully planned out. The lighting method I intend to employ is going to be extremely complicated. Essentially, I determine what I want, and work backwards to determine how to do it. What do I want? Essentially, everything lit - at least 1/4 of the windows, all the major windows on the ship, the nacelles (blue and red parts), even the starboard / port indicator lights and the light in the front of the main hull that lights the ship's designation. Let's put some numbers to what I want:
The deflector dish I can handle - drilling 100 micro / fibre sized holes and gluing the fibre strands into place, that's gonna suck. Figuring out how to light the nacelles evenly without investing in Lightsheet (whole sheets of material that are electrified to light, very expensive) is a factor, too. Here's the breakdown (brainstorm order):
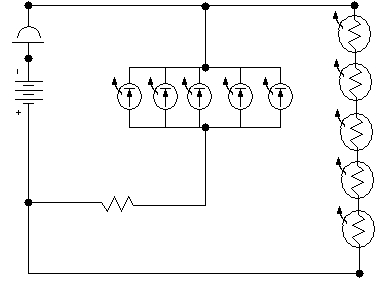
21 LEDs and 6 incandescents. The Enterprise-D model supplied the incandescent lamps, I'll have to raid RadioShack for the LEDs (noting the different kinds, big for the nacelles as opposed to tiny for the starboard / port indicators). Circuitry Now, the electronic aspect of this lighting system. The incandescents are intended to run off a 6-volt circuit, battery fed. I don't like the idea of batteries for such a thing, so I got a power transformer. As I said before (07/15/01) I'm not confident that lamps won't blow out, or eventually die on their own. I know that the primary cause of dead lamps / light bulbs is the initial surge of power when you turn it on / plug it in. Therefore, I can put a capacitor across the leads to absorb some of that. The LEDs will only need three volts, so I'll need to tuck a resistor in that circuit. This is what I've got as a rough circuit diagram:
(Try not to laugh too hard - I've learned a bit since I coughed this up. ;) 07/29/01) Pretty rough (I think I have the polarity on the capacitor backwards), but you can see what I'm getting at - essentially a 3-volt segment for the LEDs and a full 6 for the lamps, sharing a common ground with a capacitor in the middle for surge suppression. I haven't done electronics design work since I was in high school - will it work? Don't know, I'll build a dry run and see what happens. :) Window Design The windows in this thing are going to be pretty complicated in their own right. I don't want to just put a drill through them, they're squares, not circles (if you're gonna do it, do it right). Okay, this being said - how do you do this? Well, I couldn't get any size drill bit in the windows for filing into a square without a fantastic amount of work - have to remember, I'm dealing with lighting 100 windows, here. Therefore, I concluded that having totally open windows just wasn't gonna happen. The Enterprise-D model used fibre optics to light the windows. The windows on that bloody model were so tiny, I can understand the use of fibres - what's the point of anything else? The Voyager model, however, has windows that are a bit bigger, but not big enough to really open them up. So, I'm dealing with messing with light and reflectivity- not so small it's just a bright pinprick, but enough to fill up just the window, getting its light from a fibre optic strand. Okay, so what if I did this:
Well, that's what I'm going to try. We'll see how that works. :) |
 Assume we're looking at a side profile of a window indentation.